

A pile of badge scans tells you who walked past your booth. It doesn’t tell you who has a problem you solve, or when they want to solve it. A short lead capture form does: each visitor scans a QR code, answers a few questions on their own phone, and your sales team gets the context to follow up properly.
This guide walks through one complete example: Northstar, an example workflow software company, at booth 212 at Ops Summit. Visitors enter to win a pair of noise-cancelling headphones and, along the way, tell Northstar their role, what they want to improve and when.
Every valid entry has to be eligible
A prize draw includes every valid entry. You can’t limit it to people who said they want a sales call, so don’t make the prize depend on a qualifying answer. Publish official rules that name the prize, the dates and who can enter.
What You’ll Build
The Northstar booth at Ops Summit
Scan
Visitors scan a QR code on the booth sign, a session slide or the pre-show email.
Qualify
They share their role, what they want to improve and their timeline.
Enter
Every valid entry goes into the headphones draw.
Hand off
Leads go to your CRM, or to a spreadsheet for sales.
Follow up
Each lead goes to the right person, based on what they told you.
Before You Start
Decide these first
- Who follows up, and how quickly
- The prize, the entry dates and who can enter
- Which CRM fields each answer should fill
- Whether visitors use their own phones, a booth tablet, or both
- A backup plan if the venue Wi-Fi drops
Step 1: Choose a Form or a Giveaway
If you’re only collecting leads, use a Form. If you’re offering a prize, use a Sweepstakes / Giveaway: Forms don’t draw winners. Both use the same questions.
Northstar offers a prize, so it selects Create Promotion → Sweepstakes / Giveaway → Start from scratch. In Settings, set the entry dates and the time zone to match the show’s exhibit hours. See dates and time zone.
Step 2: Ask Questions Sales Can Use
Visitors fill this in while standing at your booth, so keep it short. Put the questions sales cares about right after the contact details:
| Field | Type | Required? | Why |
|---|---|---|---|
| First and last name | Name | Yes | Who to follow up with |
| Work email | Yes | Where the follow-up goes, and the key your CRM matches on | |
| Company | Text Input | Yes | Which account the lead belongs to |
| Which best describes your role? | Dropdown | Yes | Who on your team should follow up |
| What are you looking to improve? | Multiselect | Yes | What to talk about, including a “Just browsing” option |
| When are you hoping to solve this? | Multiple Choice | No | How soon to follow up. Shown only to people looking to improve something |
| I would like a follow-up call. | Checkbox | No | A clear request for a sales conversation |
| Send me product news. | Email Consent | No | Marketing permission, unchecked by default |
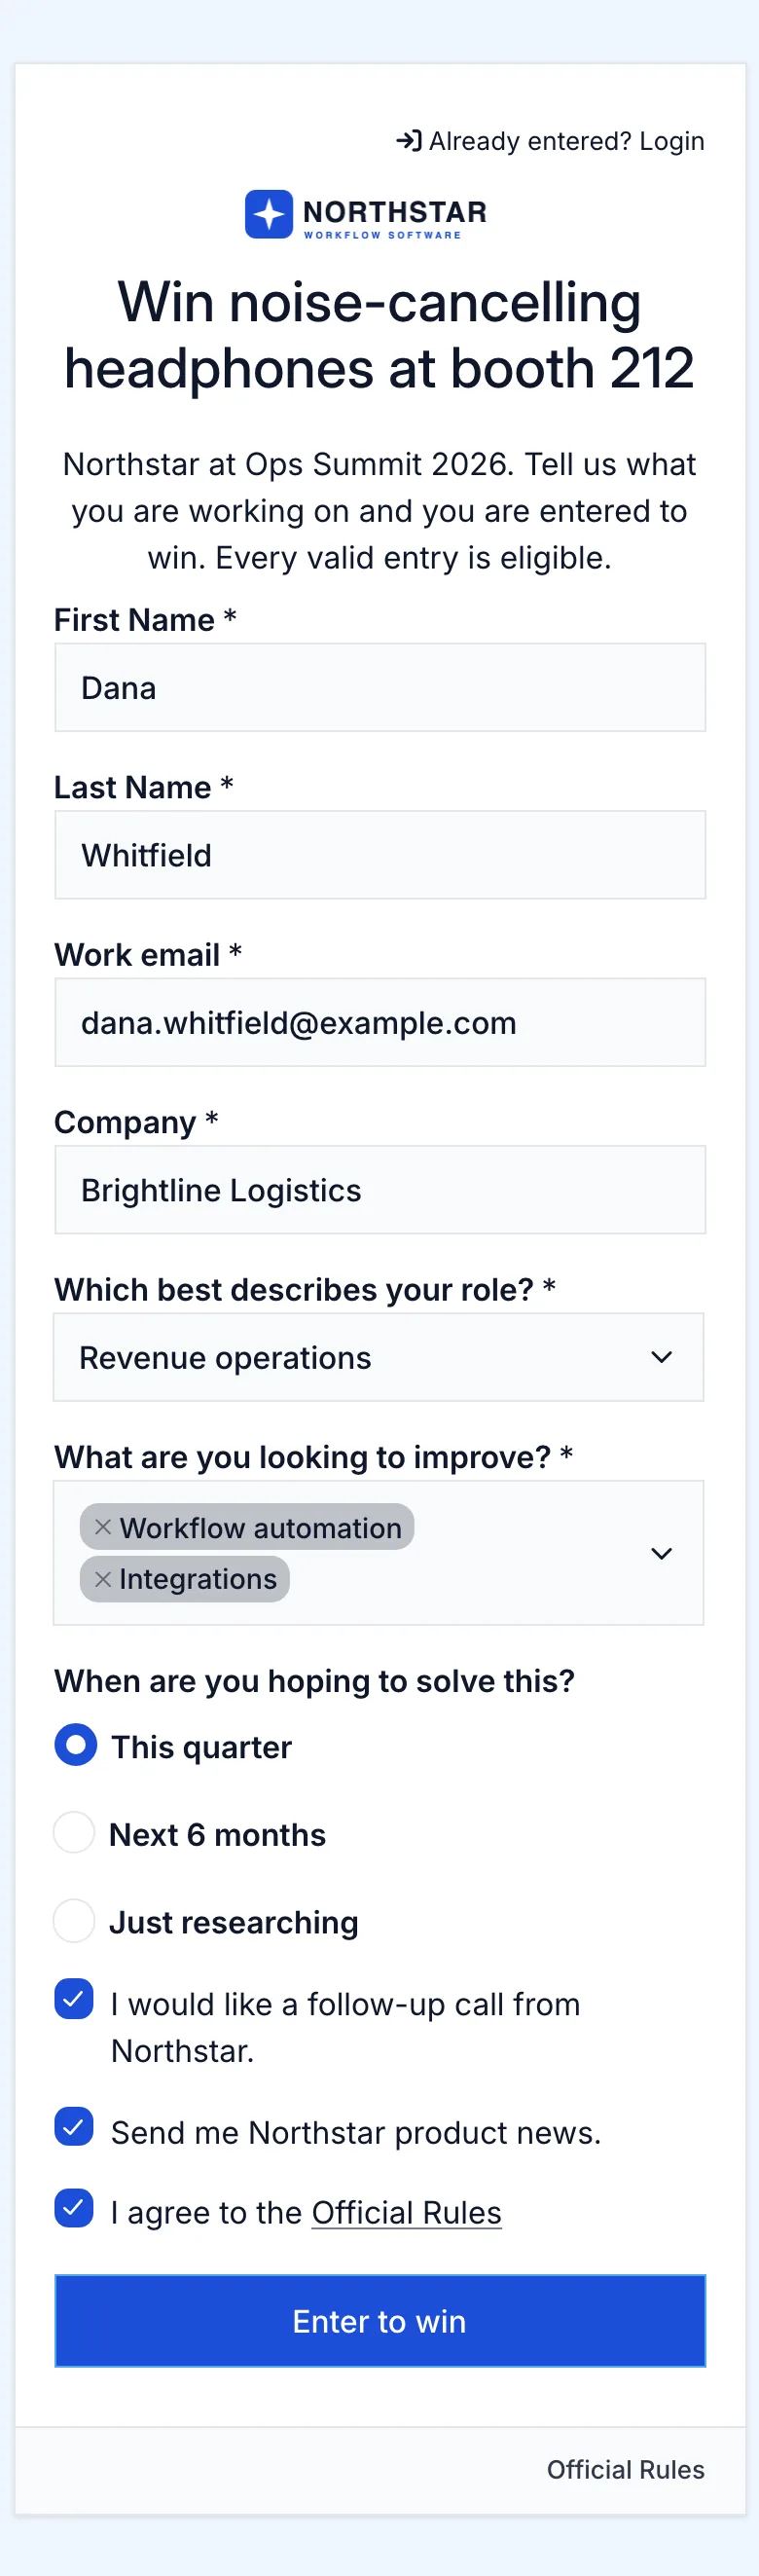
See form fields.
Step 3: Show the Timeline Question Only When It Matters
Someone who’s just browsing doesn’t need to be asked when they’re buying. On the timeline question, add a Logic rule: show it only when “What are you looking to improve?” includes any of the real options.
The export tells you which visitors skipped it and which never saw it: the answer reads “Not shown” for people the rule skipped, and “Shown, not answered” for people who saw it and left it blank. See Logic.
Step 4: Ask for a Work Email
On the email field’s Validation tab, turn on Block Only Specific Domains and list the personal email domains you don’t want, such as gmail.com, yahoo.com, hotmail.com and outlook.com. Revup doesn’t have a built-in list, so add every domain you want to block.
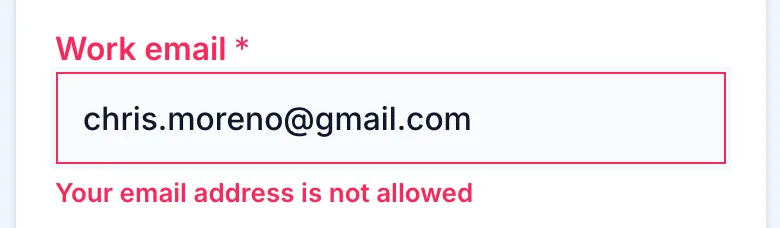
Each email can enter once. If someone tries again with the same address, Revup emails them a code to confirm it’s them, then shows their existing entry. See email verification.
Step 5: Give Every Placement Its Own QR Code
Open Share → Tracking links and add a link for each place visitors find you. Northstar uses Booth QR, Session slide and Pre-show email. Print the booth QR code large enough to scan from a few steps away.
Each lead records the placement it came from:
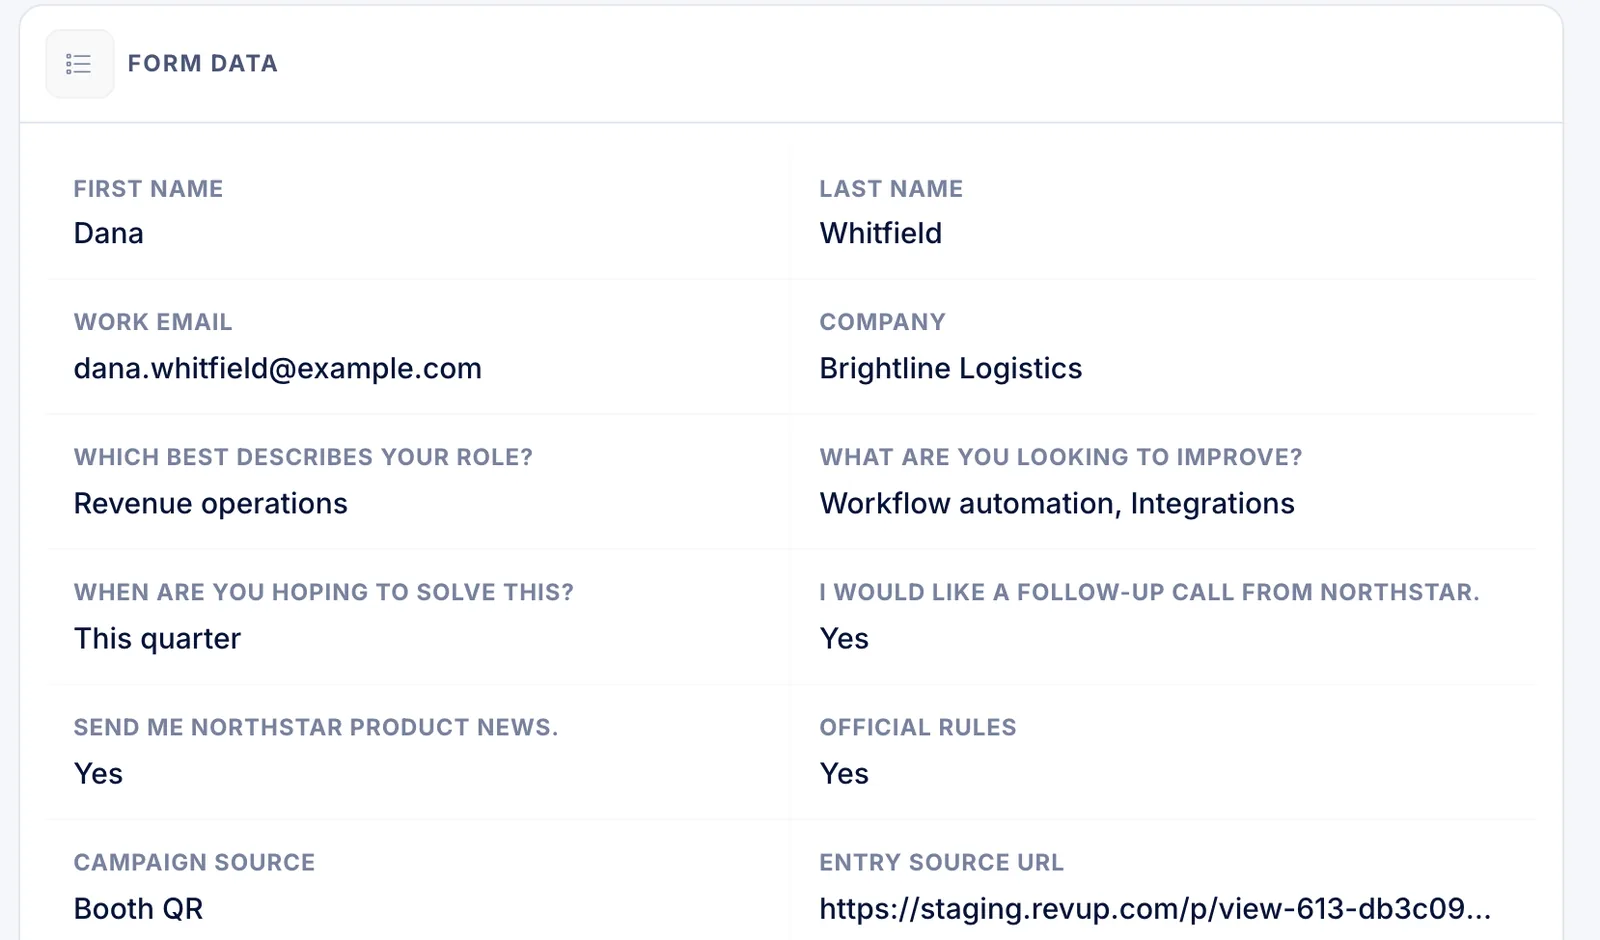
See tracking links.
Step 6: Prepare the Booth Tablet and the Wi-Fi
Visitors can use their own phones, and that’s the most reliable setup. If you also hand people a booth tablet, plan for three things:
- Security level. New promotions start on Strict, which allows one entry per IP address. A tablet, and often a whole venue, shares one address, so choose Off, or Custom with a high limit, before the show. See security levels.
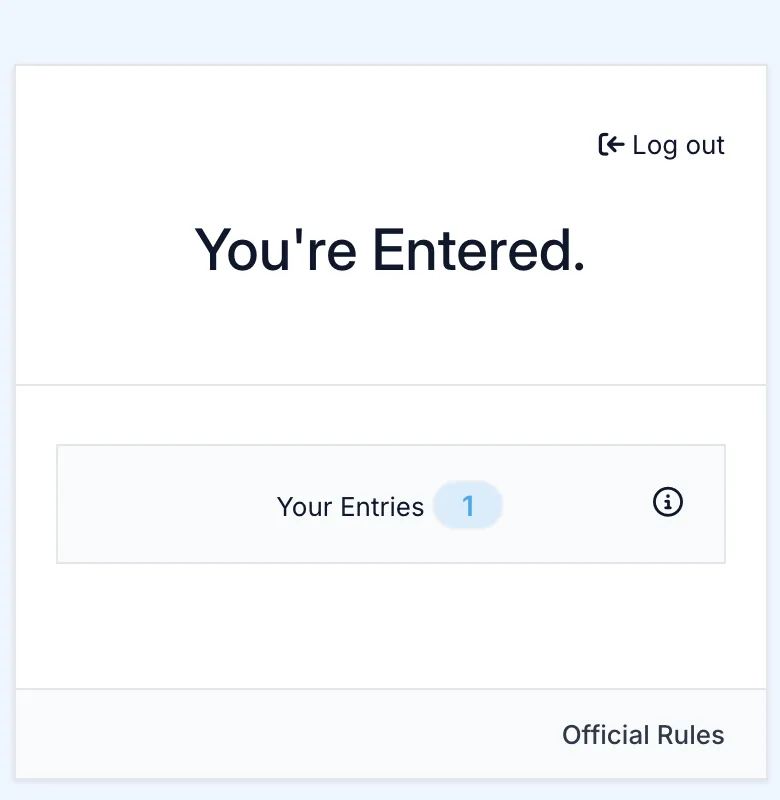
- Log out between visitors. After someone enters, the tablet keeps showing their confirmation. Tap Log out before handing it to the next person.
- A backup if the Wi-Fi drops. Revup needs a connection to submit, and there’s no offline mode. Keep the QR code visible so visitors can enter on their own phone’s data, and keep a paper sign-up sheet for anyone who can’t.
Step 7: Send Leads to Your CRM
In Integrations, connect HubSpot or another supported platform. With HubSpot, Revup creates or updates a contact by email and adds it to a static list you choose. Map each answer to a contact property:
| Revup field | HubSpot property | Notes |
|---|---|---|
| First Name, Last Name, Work email | First name, Last name, Email | Email is required and matches existing contacts |
| Company | Company name | Pick it from your contact properties |
| Which best describes your role? | Job title, or a custom property | Use a custom property to keep your own options |
| What are you looking to improve? | A custom property | Create one from the mapping screen if you need it |
| When are you hoping to solve this? | A custom property | Shows who is ready to talk now |
| I would like a follow-up call. | A custom property | Lets your team build a HubSpot view of call requests |
| Tracking link name | Sent automatically | Shows which QR code or placement each lead used |
A few things to know before the show:
- Consent decides who syncs. If your form has an Email Consent field, only people who check it are sent to HubSpot. Everyone else stays in Revup and in your export.
- Revup doesn’t set lifecycle stage or subscription status. Use HubSpot workflows on your list for that.
- Trials sync the first 20 participants. Upgrade before the show if you expect more.
Not using a CRM integration? Select Export on the Participants list for a CSV with every answer and a Campaign Name column. Delete the IP and Login Link columns before sharing it. See exporting participants.
Step 8: Decide Who Follows Up
Revup doesn’t score, route or assign leads, so agree on the rules before the show and apply them in your CRM or your export. Northstar’s are:
| What the lead said | Who follows up | When |
|---|---|---|
| Asked for a call, and wants to solve it this quarter | Account executive | Within two business days |
| Wants to solve it in the next six months | Sales development rep | Within a week |
| Just researching, or just browsing | Marketing, only if they opted in | Next newsletter |
Step 9: Draw the Winner and Report Results
After the show, open Winners → Draw Winners to draw a winner and an alternate from every valid entry. See drawing winners.
Then report each stage separately, so the giveaway isn’t mistaken for pipeline:
Event results
- Visits and entries for each QR code or placement
- Leads who wanted to solve something this quarter
- Leads who asked for a call
- Leads sales accepted
- Meetings booked, tracked in your CRM
Want to hear how the event went for attendees? Send a short post-event survey with a few questions about what they enjoyed and what to change next time.
What This Setup Doesn’t Do
- No badge scanning. Revup doesn’t read event badges or receive the organizer’s registration list.
- No offline mode. Each entry needs an internet connection to submit.
- No lead routing or alerts. Revup doesn’t notify reps or assign leads. Use your CRM for that.
- No lead scoring or notes. Use your CRM to score leads and record what was said at the booth.
Launch Checklist
Before the doors open
- Giveaway dates and time zone match exhibit hours
- Official rules name the prize, dates and eligibility
- Qualifying questions tested, including the Logic rule
- Personal email domains blocked, and an accepted work address tested
- One tracking link and QR code per placement
- Security level set for a shared tablet or venue Wi-Fi
- CRM mapping tested with a test entry
- Follow-up owners agreed
- Paper backup sheet packed
See how Revup works for B2B and SaaS teams, or build your booth form with Forms. Exhibiting at a home show instead? See our home show booth ideas for remodelers.